
Frequently asked questions
Om 3D Print
The Sculpto app is free!
If you want to get started designing your own 3D models, there are also a sea of free 3D modeling programs.
There are a large number of free 3D modeling programs that are easy and simple to get started with. Sculpto supports most programs - it just requires the program to be able to export an STL file (that is, a file in the .stl file format).
We have tested a number of programs that we recommend for beginners and more experienced 3D modelers:
Check out some of the things we have printed on ours Facebook-side and get inspired!
You can also see the models in the Sculpto app - it can be downloaded from Google Play and the App Store.
Or get started with your own designs in, for example, a 3D modeling program.
You can only print in one color at a time on this type of printer. If you want to print in several colors, it is recommended to divide the object up and print it in several parts. In addition, 3D printing is also quite useful for painting on.
The most common form of 3D printing works by the 3D printer pulling a biodegradable plastic material - shaped like a several hundred meter long string on a roll - into a hot metal nozzle, which melts the material. The metal nozzle and the substrate on which you 3D-print subsequently move in the pattern you want to print. This process is repeated layer by layer, while the distance of the metal nozzle to the substrate is increased and in this way the object you want to 3D-print is also shaped in height.
On the Sculpto 3D printer, the metal nozzle sits on a movable arm, while the print base moves circularly under the nozzle. At the same time, the distance to the print base increases layer by layer.
The Sculpto 3D printer prints with a biodegradable plastic material called PLA, which is made from sugar beet and corn. It is not harmful to health and emits no dangerous fumes when 3D printing with it. PLA comes in rolls, called filament, which can be bought at Sculpto's webshop in 0.5 and 1 kg rolls.
There is a large selection of colors, and we are constantly adding new cool variants to the webshop - see them her
We often find that people are positively surprised by the price of 3D printing. There are two primary costs associated with 3D printing:
1) The consumable: You print with filament, which you buy in rolls of 500 or 1,000 grams. To save plastic and time, your 3D prints will never be printed 100% massive. Instead, the Sculpto 3D printer inserts a grid into the solid parts of your 3D models. This maintains strength and saves material. You can adjust the strength by increasing / decreasing the lattice density.
So it is the weight of your object that determines the price. The weight is displayed before you start your print. The recommended price of 1 kg of Sculpto filament is 250 kroner. Based on that price, here are some examples of what it costs to print 3D:
Table tennis ball: 1.25 kroner.
Tennis ball: 3.25 kroner
2) Power: The power consumption of a Sculpto 3D printer is about the same as that of a laptop.
Setting up the printer
First of all, check the security of your network. Sculpto and Sculpto + can not be set up on a network with WPA2 Enterprise or a network where you have to log in with personal user login - setup for such a network is only possible with the Pro version of the Sculpto printer. If the printer has previously been set up ( Without being disconnected), make sure you are logged in to the Sculpto user (In the app) connected to the printer. You can see if you are logged in to the correct user when the option to "connect printer" disappears on the printer page. There can be a maximum of one unique user associated with each printer. Contact our customer service with the printer's serial number if you do not know which user the printer is set up for.
I still can not connect my printer to the network. What do I do?
If you've been through the above points and you still have not figured out why you can not connect your printer to the network, check out the following points:
Make sure your printer is within range of your Wi-Fi network. Make sure you have downloaded the latest version of the Sculpto app. Make sure to set up the printer via the iOS or Android app. The printer cannot be set up from the web app (http://app.sculpto.dk) .Try restarting the app and printer. Make sure your router is transmitting a 2.4 GHz connection.
White (Looks light blue to anyone): The printer is connected to the network and is ready for use.
Blue, flashing: The printer is trying to connect to the latest network it has been asked to log on to.
Blue, constant: The printer is connected to the web, it is trying to connect to our server.
Yellow, Blink (Looks light green to someone): The printer cannot connect to a network or is not set up.
Small: The printer is receiving an update. Mixed colors: If the printer has not been restarted or is installing an update, this is a color code to confirm your presence.
Red, constant: Contact customer service.
If your printer does not show you a color code when you are prompted to enter a color code in the app, it may be because your printer needs to download an update.
If you have not received a notification in the app about an available update, you can try the following:
Log out and log in again to your appTry logging in via another device or via the web appDown and reinstall the Sculpto app and try again
You log in to the user associated with the printer and select “Printer Tools”. Then tap "switch Wi-Fi" and follow the instructions in the app.
A maximum of one unique user can be connected to each printer, and therefore a printer can not be connected to a new user if it is already connected to another user, unless you log in to the original user and press “Disconnect / Disconnect from user ”. You can find this option by going to "user settings" (the middle of the 3 tabs at the bottom) and pressing the gear in the upper left corner.
This helps ensure that one's neighbor does not steal one's printer and helps increase security.
Before a print
1. Make sure the end of the filament thread that you insert into the printer is cut to the point
2. Be sure to push the filament thread in as far as it will go and maintain this pressure while pressing "eat filament" inside the app
3. Make sure that the filament roll can rotate freely
I'm still having trouble getting the printer to eat the filament. What else can I do?
If the above points do not help, check if your printer's filament gear is worn. If your filament gear looks worn, you can order a new one in our webshop here on the website.
If you have the STL file with your own model on your PC, you can use the web app to print from. You do this by logging in https://app.sculpto.dk/ and then select "print own STL file", which you will find in the upper right corner. Next, press "upload" and find the file you would like printed.
If you have the STL file that you want to print, located in eg iCloud, then you can also print it via the app on your mobile or tablet by clicking on "print your own STL file", which you can find under the tab "Printer" (tab at the bottom right)
Yes, you can also print via Sculpto's web app. You will find it https://app.sculpto.dk/. Note, however, that you can not use the web app in connection with the printer setup.
You do this by going to "printer tools" in the Sculpto app (the Y-calibration can be found under the category "advanced").
When starting a calibration of either the Y or Z axis, simply follow the instructions in the app.
If you are in doubt about whether you have calibrated the Z axis correctly, you can too watch the following instructional video
Under et print
You can easily close the app once the printer has started. You can even turn off your Wi-Fi - once the printer is turned on, the print file is located locally on the printer's memory and therefore does not need contact with the controller or your home network.
The problem (also called warping) may be due to the Z-axis being calibrated too far from the circuit board.
1) Therefore, try a manual calibration of the printer by going to "printer tools" in the Sculpto app. See this video on how to properly calibrate the printer.
2) If you have a buildtak printed circuit board, we recommend cleaning it with glass cleaner when you experience that the adhesion is reduced.
3) If your printer is in a place where the temperature is lower than room temperature (22 C) or where there is a risk of drafts, this may affect the filament and cause it to drop on the circuit board. In this case, be sure to place your printer in a place where the temperature is warmer and there is no risk of drafts.
4) Check if there is dirt or filament residue on the circuit board's 3 magnets or down in the 3 holes that could cause the circuit board to not lie stably on the printer when printing. If the circuit board is not positioned optimally, this may also cause warping.
No, this is not possible.
If you find that not enough filament comes out of the nozzle when you print, which results in your print object getting holes or completely missing some layers, then it is probably due to one of two things:
A) Filament gear. If your printer's filament gear that pulls the filament into the printer is worn, dirty, or not fitted properly, and therefore does not make strong enough contact with the filament you have inserted into the printer, it may not be extruded enough. filament during printing. Investigate if your filament gear can be the explanation by doing as in the first half of this video.
B) Nozzle. It is usually the filament gear that is the problem - so DO NOT start cleaning the nozzle until you have tried to change the filament gear. It is relatively difficult to clean the nozzle and improper assembly of the system can aggravate the problem. If you have changed the filament gear, checked that it is assembled correctly and checked that there are no filament residues around the gear and that filament still does not pass through, then continue to the second half of this video - Follow the video slavishly and make sure to assemble the system exactly as instructed in the video.
After a print
This may be because the Z axis is calibrated too close to the circuit board. Try performing a manual calibration of the printer by going to "Printer Tools" in the Sculpto app.
For larger objects, the circuit board can flex a bit for the purpose of causing the circuit board to drop. In addition, you can try with a spatula, dough scraper, etc. to remove the object with if it is really firmly attached. See the instruction video below for an example of how this can be done.
Layer shifts can be due to several different factors. In the following, they are the most common:
- The Z axis is calibrated too close or a little too far from the circuit board
- Your circuit board is no longer sufficiently flat - either due to wear or because there is dirt between the magnets on the underside of the circuit board and the magnetic holes in the base of the printer
- You might be trying to print an object that is not designed for this type of 3D printer
- Incorrect choice of support when uploading your own .stl file
If none of the above options seem to be the case - try rotating or rotating the model. Always try to turn the model in a way where the model supports itself, so that the model needs the least possible support structure and thus must print as little as possible in the open air. An example: If you need to print a glass, turn it upside down towards the circuit board, then no support structure should be used, whereas if you turn the glass upside down, then the entire bottom of the glass will have to be covered in support structure, which increases printing time , material consumption and probability of failure.
If you find that all your prints are shifting, no matter what you do, then it could indicate a mechanical error. Start by examining if dirt or filament debris has fallen into the large round gear that rotates the circuit board. Next, perform a Y-calibration under advanced settings in the app. If it still does not help, contact support.
If you have problems with your prints in the center of the plate, it may be because the arm (Y-axis) is not calibrated correctly. You can check this by starting a calibration of the Y-axis under "printer tools" in the app. Follow the instructions in the app. Note that it is important that you use a very accurate measuring tool, such as a caliper, to measure the length of the printed Y-test. Then enter the length of the Y-test in the app to complete the calibration of your printer's Y-axis.
Maintenance
show you notice small scratches on the surface of your 3D prints, or if the two steel axes on the printer look dry, it is recommended to put a single drop of sewing machine oil on the two steel axes (Do not use WD40 as this will affect the coating on the steel shafts!).
Every 6 months, the printer threaded rod should be lubricated with PFTE lubrication.
The Buildtak circuit board is cleaned with window cleaner when you experience that the adhesion is reduced. The original white circuit board should be replaced with a Buildtak board when the adhesiveness is reduced.
Clean the white and black plastic parts of the 3D printer with a damp cloth. Dust and dirt can get stuck in the 3D printer gear and bearings, causing poor print quality or mechanical failure.
Also clean the surfaces under the circuit board regularly.
Basically, there are only 2 wear parts on the printer. How fast - if they "wear down" at all - depends on how well you handle the printer.
If you treat it well, they can last for years. If, on the other hand, it is treated incorrectly or roughly, the parts wear more.
The two wear parts consist of a filament gear which advances the filament cord and the oval printed circuit board of the printer on which the objects are printed. They can be purchased by searching in Sculpto's webshop or at Sculpto dealers.
Further information
You can now enable expert mode for your printer. This will make it possible to print raw g-code on your Sculpto 3D printer. When enabled it cannot be disabled and we will always be able to see that you have enabled expert mode.
PLEASE NOTICE THAT WE STRONGLY ADVISE AGAINST ENABLING EXPERT MODE SINCE USING IT CAN SEVERELY DAMAGE YOUR PRINTER. PLEASE READ THE TERMS AND CONDITIONS CAREFULLY.
When you print g-code using expert mode the printer automatically heats up and running the start sequence like you know from printing your own STL or when printing a model from the app. This heats the hot-end to 200 degrees Celsius and then the start sequence begins with the probing of the print bed and extruding in the perimeter of the build plate. This means that we have injected the offsets that is unique to your printer and you don’t have to worry about the offsets when printing your own g-code. After the start sequence it will automatically start printing the g-code that you have uploaded to your printer. Please be very careful where you place center in your slicer and the size of the buildplate. We cannot advice on this since it is different from slicer to slicer. The build space is 20 centimeters in diameter and 16 centimeters in height.
If you wish to enable expert mode please go to https://app.sculpto.dk/#!/expert. Please make sure to be logged into the web-app with the user that owns the printer you wish to enable expert mode on otherwise you will not be able to proceed.
To change the language of the app, go to user settings (go to the middle of the 3 tabs at the bottom and press the small gear in the upper left corner). Here "change language" is one of the functions you can choose.
To change language in the web app you must click on the icon of the globe in the upper left corner of the front page, where you will be asked to enter your login information.
The Sculpto app is currently available in 2 languages: Danish and English.
We strongly recommend that you use original Sculpto filament for your Sculpto 3D printer. Not only does this ensure the highest success rate on print, but it is also a biodegradable and non-harmful quality filament that makes solid and durable objects.
In addition, we can only maintain the warranty on your printer if you use Sculpto filament, as otherwise we can not guarantee the life of the printer!
The original Sculpto filament can be purchased directly at ours Online store.
If you still want to use another filament, then you should activate "Expert Mode”So that you can set the print settings for a new type of filament, as otherwise you will experience a reduced print quality and that the raft can not be removed and in addition you risk the nozzle being stopped, which is not covered by the warranty when using non-original filament.
The main difference between the three print settings is the layer thickness of a print, as well as how long it takes to print the item.
‘Fine’ printer with a layer thickness of 0.15mm. ‘Normal’ 0.25mm printer. ‘Fast’ 0.35mm printer.
It runs with a nozzle size of 0.4 mm. The printhead is produced in England by a company called E3D, which is known for producing some of the best printheads in the world.
The printer and the app do not talk directly to each other and therefore do not need to be on the same network. The printer talks to the Sculpto app through our server via the Internet.
You can log in to your user from several devices at once and thus control and track your printer both from your computer in the office or your iPad at home on the couch.
Calibration
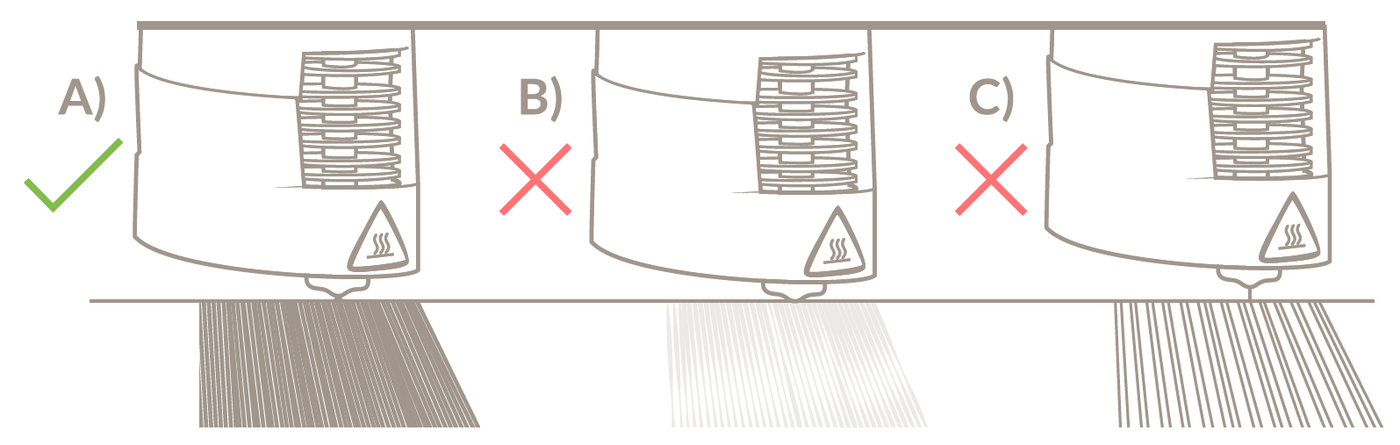
A good first layer is crucial to whether a print was successful or not. If the nozzle is too far from the plate as seen in the first image, there is a risk that the object will release the plate during the printing process. If the nozzle is too close, it will wear on the feed system and the circuit board. In addition, there is a risk that the arm will bend over. The first layer does not have to be 100% perfect to achieve a successful print, but it does increase the probability a lot. The Z-axis is calibrated under printer tools in the Sculpto app.